
- All
- Product Name
- Product Keyword
- Product Model
- Product Summary
- Product Description
- Multi Field Search
Views: 0 Author: Site Editor Publish Time: 2025-12-17 Origin: Site


You can start tufting with a robotic tufting machine, even if you are new. MIXC TEXTILE TECHNOLOGY CO., LTD. helps you try new things and make nice pieces. When you use this new technology, you get more than just speed and accuracy. You get to be creative and make better work.
You work faster and get more done with automation.
You make hard designs and change your tufting projects.
You get the same good quality and waste less.
Tufting feels fun and easy. You will soon see how simple it is!
Robotic tufting machines help you be more creative and work faster. You can make detailed designs quickly and with less hard work.
Begin with easy projects to help you feel more sure of yourself. Making small things like coasters or mini rugs lets you learn the basics. You will not feel stressed or confused.
Pick good materials, like strong fabrics and nice yarn. This makes your tufted projects look better and last longer.
Keep your workspace and tools neat to stay safe and work better. A clean area helps you finish faster and keeps you from getting hurt.
Practice often and look for ideas from online groups. This will make your tufting skills better and help you stay excited.
A robotic tufting machine helps you make carpets and rugs with less effort. You use a computer to control the machine, so you can create designs quickly. The machine does most of the work for you. You just set up your design and let the robotic tufting machine handle the rest. This technology changes how you think about tufting. You get more control, better results, and save time.
You start by choosing your design on a computer. The robotic tufting machine reads your file and gets ready to work. It moves the tufting gun across the fabric, placing yarn exactly where you want it. You do not need to push the gun by hand. The machine uses software to make sure every tuft is in the right spot. You can change your design easily. If you want to try something new, you just upload a new file. The robotic tufting machine works fast and keeps your work neat.
Tip: You can manage the whole process by yourself. You do not need a big team. This saves you money and lets you focus on your creative ideas.
Here are some things you get with a robotic tufting machine:
Precision: Each tuft goes exactly where you want.
Design flexibility: You can test new patterns and change them quickly.
Efficiency: You finish projects faster than with manual tufting.
Quality control: Your carpets look the same every time.
Waste reduction: You use less yarn and avoid mistakes.
When you use a robotic tufting machine, you can choose between cut pile and loop pile. Cut pile means the yarn is cut, so the surface feels soft and plush. Loop pile keeps the yarn in loops, making the carpet feel firm and textured. MIXC’s robotic tufting machine lets you switch between these styles. You can even mix both in one project. This gives you more options for your designs. You decide how your rug will look and feel.
Note: Cut pile is great for cozy rugs. Loop pile works well for patterns and strong surfaces. Try both to see which you like best.
Getting started with tufting is easier when you know what tools you need. You want to set up your workspace with the right tufting equipment. Let’s look at each item and see how it helps you create beautiful rugs and textiles.
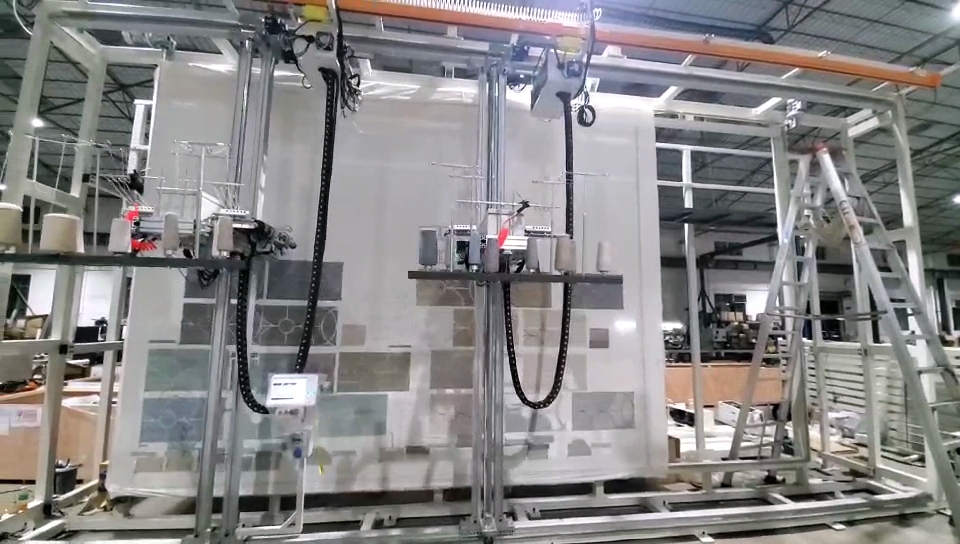
The MIXC Robotic Tufting Machine is the heart of your setup. You control it with a computer, so you can make designs quickly and easily. This machine uses advanced automation to place yarn with high precision. You get repeat positioning accuracy of ±0.1mm/m, which means your patterns look sharp every time. The MIXC machine works fast, with speeds up to 2000 stitches per minute for cut pile and 2500 for loop pile. You can adjust the pile height from 5mm to 40mm and the stitch size from 2mm to 8mm. The intelligent system lets you change needle intervals and switch between cut pile and loop pile. You save time and get consistent results. Beginners love this machine because it is easy to use and helps you focus on your creative ideas.
Tip: Start with simple designs. The MIXC Robotic Tufting Machine makes it easy to learn and improve your skills.
You need a sturdy tufting frame to hold your fabric tight. You can use a DIY wooden frame or an instant tufting frame. Some beginners use needle punch kits with embroidery rings. The frame keeps your fabric flat, so the yarn goes in smoothly. For fabric, choose monks’ cloth, linen, or hessian. These fabrics work well with tufting machines. Make sure the weave matches your needle size. Monks’ cloth is a popular choice because it is strong and easy to work with. Linen and burlap also give good results. If you use larger needles, pick thicker fabrics like rug warp. For smaller needles, try weavers’ cloth or cotton.
Tufting frame: Holds fabric tight for even tufting.
Monks’ cloth: Strong and beginner-friendly.
Linen: Smooth and durable.
Hessian/Burlap: Good for textured projects.
Yarn is the star of your tufting project. You want to pick yarn that matches your design and feels nice to touch. Start with acrylic yarn for practice. It is affordable and easy to use. When you want your rug to last longer, switch to high-quality yarn like wool or eco-cotton. Check the yarn weight and gauge size to make sure it fits your tufting tool. Heavy yarn may need you to adjust the tension on your machine. The right tufting yarn helps you avoid problems like breaking or fraying. You get better results when you match the yarn to your fabric and tool. Try different colors and textures to make your project unique.
Acrylic yarn: Great for learning and testing.
Wool yarn: Durable and soft.
Eco-cotton yarn: Good for eco-friendly projects.
Tufting yarn: Designed for rug making and works well with machines.
Note: Using high-quality yarn makes your rugs look professional and last longer.
Backing and glue keep your tufted project together. After you finish tufting, you need to secure the yarn so it does not come loose. Use a backing cloth like Action Bac or Final Backing Cloth. For glue, pick latex adhesive or carpet adhesive. These adhesives are strong and flexible. They help your rug stay in shape and handle daily use. If you make wall pieces or pillows, polyvinyl acetate glue works well. For garments, brushable latex or iron-on interfacing is a good choice. Always match the adhesive and backing to your project type.
Type of Project | Primary Adhesive | Backing Cloth | Contact Adhesive |
|---|---|---|---|
Wall pieces, pillows | Polyvinyl Acetate (Elmer’s) | Action Bac or Final Backing | Gorilla Spray Adhesive, Roberts 8200 |
Garments, accessories | Brushable latex, iron-on interfacing | Lining recommended | Gorilla Spray Adhesive, Roberts 8200 |
High traffic rugs | Carpet adhesive, latex adhesive | Final backing fabric required | N/A |
Latex adhesive: Easy to apply, low smell, flexible.
Carpet adhesive: Strong and holds backing well.
Final backing cloth: Adds strength and durability.
You need a few extra tools to finish your tufting project. Clippers and scissors help you trim the yarn and shape your rug. A shearing machine gives your rug a smooth surface. Use a vacuum system to clean up loose yarn. A pile preparing machine helps you get the right texture. Woven polyester backing fabric adds extra support.
Clippers: Trim yarn for a neat look.
Scissors: Cut yarn and shape edges.
Shearing machine: Smooths the rug surface.
Vacuum system: Cleans up yarn scraps.
Pile preparing machine: Prepares yarn for tufting.
Woven polyester backing: Adds strength to your finished piece.
Tip: Organize your tools so you can work faster and keep your workspace tidy.
Choosing the right tufting equipment makes your work easier and more fun. You get better results and learn faster. Start with simple tools and upgrade as you gain experience. The MIXC Robotic Tufting Machine and quality materials help you create rugs and textiles you can be proud of.

Safety comes first when you set up your tufting workspace. You want a room that feels comfortable, bright, and free of clutter. Good lighting helps you see details and avoid mistakes. Keep the floor clear so you do not trip. Always check your tufting gun for damage before you start. Clean it often to keep it working well. Wear safety glasses and a dust mask if you work with lots of yarn or glue. Choose clothes that fit snugly and cover your arms. Use proper electrical outlets to prevent shocks. Here’s a quick safety table for your workspace:
Safety Aspect | Guideline |
|---|---|
Workspace Organization | Keep the area tidy and well lit |
Equipment Handling | Read the manual and practice on scrap fabric |
Personal Protective Equipment | Wear safety glasses and a mask when needed |
Tip: Stay alert and take breaks to avoid accidents.
A tidy workspace helps you work faster and safer. Group your supplies by function. Put scissors, rubber bands, and other small tools in separate containers. Store yarn vertically so it does not tangle. Use a folding table if you need more space. Label everything so you can find it quickly. Keep your chair comfortable and make sure it supports your back. Hang tools on a pegboard or use rolling carts for easy access. Place non-slip mats under your frame to keep it steady. Organize yarn by color so you can switch shades easily during tufting.
You need a strong frame for tufting. Start by measuring and cutting four pieces of wood for the sides. Put them together to make a square or rectangle. Add corner pieces to make it sturdy. Attach carpet grippers with the nails pointing out. Use a staple gun or glue if needed. Add a hook to guide the yarn and dowels to hold it in place. Lay out the frame pieces, screw them together, and make sure everything feels solid. Attach the yarn guide and tacking strips with the spikes facing out. Now your frame is ready for tufting.
Note: A well-prepared frame keeps your fabric tight and makes tufting easier.
Ready to bring your design to life? You can operate a robotic tufting machine with just a few steps. Let’s walk through the process together, so you feel confident and safe every time you start tufting.
You begin by loading your design into the machine’s computer system. MIXC’s Robotic Tufting Machine uses smart software that supports DST and DSB formats. You can create your design on a computer or tablet, then upload it directly to the machine. If you want to trace a pattern, use a projector to shine your design onto the stretched fabric. This helps you see where each tuft will go. Double-check your design placement before you start. The machine reads your file and gets ready to follow every detail.
Tip: Start with simple shapes and patterns. You can always try more complex designs as you get comfortable with tufting.
The tufting gun is the main tool that pushes yarn through the fabric. You don’t need to move it by hand—the robotic system does the work for you. For beginners, a cut pile tufting gun is a great choice. It automatically cuts the yarn, making the process easier and giving your rug a soft finish. You thread your yarn through the tufting gun using a needle threader. Make sure the yarn is smooth and untangled. The gun moves across the fabric, creating raised surfaces and patterns. You get professional results without much effort.
When you start, use the tufting gun at a low speed. This helps you learn how the machine works and keeps your yarn from breaking. Apply steady pressure so the yarn goes through the fabric cleanly. Always check that the gun is working smoothly before you begin a new project. If you want to switch between loop pile and cut pile, MIXC’s machine lets you do that with a simple setting.
Note: Maintaining your tufting gun is important. Clean it after each use and check for any loose parts. This keeps your machine running smoothly and helps you avoid problems.
You can adjust several settings on your robotic tufting machine to match your project needs. Here’s a quick table to help you understand what each setting does:
Setting | What It Does |
|---|---|
Pile Height | Change the length of the yarn loops or cuts for a thicker or thinner rug. |
Foot Position | Align the foot with the needle for smooth operation. |
Scissor Opener | Make sure scissors open when the needle moves forward for clean cuts. |
Needle Position | Keep the needle tip inside the foot when scissors are forward. |
Break Bar | Adjust to keep it perpendicular for proper tension. |
You can change the pile height by adjusting the upper bearing rod. Shorten it for a higher pile, or extend it for a lower pile. Always check the foot position and needle alignment before you start tufting. If you want clean cuts, make sure the scissor opener works when the needle is fully forward. These settings help you get the look and feel you want for your rug.
Tip: Test your settings on a scrap piece of fabric before starting your main project. This helps you avoid mistakes and saves yarn.
Now you’re ready to tuft! Here’s a step-by-step guide to get you started:
Stretch your fabric tightly on the frame.
Load your design into the machine.
Thread your yarn through the tufting gun.
Set your pile height and other settings.
Press start and watch the machine begin tufting.
You can watch the robotic tufting machine move the gun across the fabric, placing each tuft exactly where you want. Start with minimum speed and increase it as you get more comfortable. Use strong, steady pressure to make sure the yarn goes through the fabric. If you want to change colors or patterns, pause the machine and reload your design or yarn.
Tip: Stay close to the machine while it works. You can stop it quickly if you notice any problems.
Even with smart automation, you need to keep an eye on your tufting machine. Here are some common issues and how to fix them:
Issue | Possible Causes | Solutions |
|---|---|---|
Machine stops | Power cord not plugged in, switch malfunction | Check power connection |
Yarn jam | Tangles in threading path, main gear obstruction | Inspect threading path and main gear |
Overheating | Extended use without cooling | Allow machine to cool down |
Jumpy or stuttering movement | Lack of lubrication, loose parts, misaligned needle | Lubricate parts, tighten screws, check alignment |
Constant beeping sound | Motor overheating, loose connections, internal issues | Turn off, check connections, inspect for debris |
Yarn breaking or stuck | Sharp edges, blocked guides, poor yarn quality | Inspect yarn path, smooth edges, use quality yarn |
If the machine stops, check the power cord and switch. Yarn jams happen when the threading path gets tangled or the main gear is blocked. Overheating can occur if you run the machine for too long. Let it cool down before starting again. If you notice jumpy movement, add oil to the moving parts and tighten any loose screws. A constant beeping sound means the motor might be overheating or there are loose connections. Turn off the machine and check for damage. If your yarn keeps breaking, look for sharp edges in the yarn path and use high-quality yarn.
Note: Most problems have simple solutions. Stay calm and check each part of the machine. You’ll get better at troubleshooting with practice.
You can enjoy tufting with confidence when you follow these steps. MIXC’s intelligent features, like automated yarn break detection and easy computer controls, make the process smooth and beginner-friendly. You get to focus on your creative ideas while the machine handles the hard work.
You finished tufting your design. Now, you need to take your piece off the frame. Start by loosening the fabric from the grippers or staples. Work slowly so you do not pull out any yarn. If you see any loose threads, tuck them back in with a needle. Lay your tufted piece flat on a clean surface. This step helps keep your rug’s shape and prevents stretching.
Tip: Always check the edges for loose yarn before moving to the next step.
Backing and glue make your tufted project strong and long-lasting. Flip your piece over so the back faces up. Use a brush or spatula to spread carpet adhesive or latex glue over the yarn ends. Cover the whole area evenly. Press your backing cloth onto the glue while it is still wet. Smooth out any wrinkles with your hands. Let the glue dry for several hours. This step keeps the yarn in place and adds support.
Trimming gives your rug a neat, professional look. Use sharp scissors or a shearing machine to cut any uneven yarn. Clean the blades and cutting area after each use. Apply a little oil to moving parts so everything works smoothly. Check for worn parts and replace them if needed. Store your trimmer in a dry place and use a blade guard. Always keep your hands away from the cutting area.
Step | Description |
|---|---|
Regular Cleaning | Clean blades and cutting area after each use to remove yarn fibers and dust. |
Lubrication | Apply oil to moving parts for smooth operation. |
Inspect for Wear | Check for damage and replace worn parts. |
Storage | Store trimmer in a dry place with blade guard. |
Safety Precautions | Keep hands away from cutting area during operation. |
You want your tufted rug to look great for years. Rotate your rug every six months to keep wear even. Move it 180 degrees to balance sunlight and foot traffic. Inspect the underside for damage or bugs. Vacuum your rug twice a week, especially in busy areas. Use a vacuum without beater bars to protect the tufts. Clean spots with a wet sponge and mild cleaner. Do not wash your rug with water. Act fast on spills to stop stains. Avoid harsh cleaners to keep fibers safe.
Rotate rugs every six months for even wear.
Move rugs 180 degrees to balance exposure.
Inspect underside for damage or infestation.
Vacuum twice a week, more in busy areas.
Use a vacuum without beater bars.
Spot clean with a wet sponge and mild cleaner.
Avoid washing with water.
Act quickly on spills.
Avoid abrasive cleaners.
Note: Regular cleaning helps you spot problems early and keeps your tufted project looking fresh.
You want to build your confidence with tufting. Begin with small projects like coasters, mini rugs, or wall hangings. These pieces let you learn the basics without feeling overwhelmed. You see results quickly and feel proud of your progress. Small projects help you practice different techniques and try out new patterns. You can finish them in a short time and move on to bigger ideas when you feel ready.
Tip: Choose simple shapes for your first project. Circles, squares, or hearts work well and look great.
You learn faster when you watch others tuft. Many creators share step-by-step videos online. These tutorials show you how to set up your machine, thread yarn, and fix common mistakes. You see each step in action and follow along at your own pace. Videos help you understand tricky parts and give you new ideas for your next project. Pause and replay as needed until you feel confident.
Where to find tutorials | What you learn |
|---|---|
YouTube | Machine setup, basic skills |
Quick tips, creative designs | |
TikTok | Fun, short tufting demos |
You get better at tufting with practice. Try new techniques and experiment with different yarns. Make time to work on your projects regularly. Each piece teaches you something new. You notice your lines get straighter and your patterns look sharper. Mistakes happen, but you learn from them and improve. Keep a notebook to track what works best for you.
Note: Practice helps you build muscle memory and makes tufting feel natural.
You never run out of ideas when you look for inspiration. Blogs like "6 Awesome Projects to Tuft Your Life" and "8 Easy Rug Tufting Ideas For Your Creative Life" share fun projects for beginners. Guides such as "What Beginners Should Know Before Tufting" offer helpful tips. You can join online communities like Clawlab to connect with other tufting fans. Members share advice, answer questions, and celebrate your finished pieces. You feel motivated and supported every step of the way.
Explore beginner-friendly blogs for new project ideas.
Check out guides for essential tips.
Join communities to ask questions and share your work.
Tip: Inspiration and support make your tufting journey more enjoyable and creative.
You’ve learned how to set up your workspace, choose the right materials, and operate a robotic tufting machine. When you finish your first project, remember these key points:
Start with simple designs for a clean finish.
Mistakes are easy to fix, so don’t worry.
Making custom rugs feels rewarding and fun.
If you want to succeed, try these steps:
Pick a tufting gun that fits your style.
Learn about cut pile and loop pile techniques.
Build a sturdy frame for your tufting.
MIXC offers support and guidance, so you can keep improving. Take action, enjoy the creative process, and watch your skills grow!
Pick yarn that matches your project. Acrylic yarn works well for practice. Wool yarn feels soft and lasts longer. Check the thickness so it fits your tufting machine. Try different colors to make your design stand out.
Yes, you can use the MIXC machine for small rugs, wall art, or coasters. The machine lets you adjust settings for different sizes. Start with simple shapes to learn how the machine works.
Check the yarn path for sharp edges. Use high-quality yarn that fits your needle size. Make sure the tension is not too tight. Clean the machine often to keep it running smoothly.
Vacuum your rug twice a week. Use a soft brush or sponge for spots. Rotate the rug every six months. Avoid harsh cleaners and keep your rug out of direct sunlight to prevent fading.


